Raspberry Pi 2 B+ notes
Most of these work fine on newer Raspberry modules with the respective latest versions of software.
General introduction, miscellaneous
- Beginners guide: http://www.neil-black.co.uk/raspberry-pi-beginners-guide#.VmHHVa6rTmE
- Setting up a Spark cluster: https://darrenjw2.wordpress.com/2015/04/18/setting-up-a-standalone-apache-spark-cluster-of-raspberry-pi-2/
- Creating Raspbian SD card
- Serial connection instructions; device and drivers.
- OSX SD card notes
Cluster notes
VNC on the Pi
Connect to the Pi and install the VNC server
sudo apt-get install tightvncserver
Next, run TightVNC Server which will prompt you to enter a password and an optional view-only password:
tightvncserver
Getting the WiFi to work with UOSecure
1. Add the authentication details
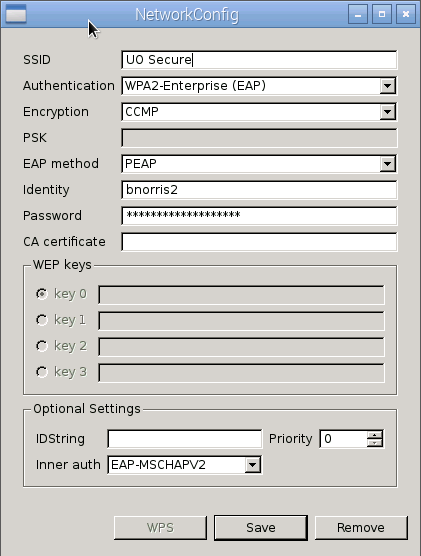
The Pi comes with wpa_gui, but that is not sufficient to get the WiFi to work with UOSecure.
In wpa_gui, scan for networks, select UOSecure, then edit the configuration as follows:

After that, make sure to File->Save to save it.
2. Edit /etc/network/interfaces
auto lo

iface lo inet loopback
iface eth0 inet dhcp

allow-hotplug wlan0
auto wlan0
iface wlan0 inet manual
wpa-roam /etc/wpa_supplicant/wpa_supplicant.conf
iface default inet dhcp
3. Edit /etc/dhcp/dhclient.conf
Authentication in UOSecure takes a while, so we need to adjust the timeouts, e.g.:
timeout 60;
retry 15;
initial-interval 1;
Preventing the Pi from sleeping
sudo vi /etc/kbd/config
Edit the following values:
 BLANK_TIME=0
 POWERDOWN_TIME=0
Cloning or upgrading SD card on Mac OS X
- Cloning: http://computers.tutsplus.com/articles/how-to-clone-raspberry-pi-sd-cards-using-the-command-line-in-os-x--mac-59911
- Upgrading: https://www.andrewmunsell.com/blog/upgrading-raspberry-pi-sd-card
Reverse port forwarding for accessing Pi behind firewall
http://www.tunnelsup.com/raspberry-pi-phoning-home-using-a-reverse-remote-ssh-tunnel
http://toic.org/blog/2009/reverse-ssh-port-forwarding/#.VPnvZGTF8kN
1. Reverse tunneling from the Pi
On the Pi, run a reverse ssh tunnel, e.g.:
ssh -f -N -R 2222:localhost:22 username@host
where host is the IP address of the machine which is accessible from the outside (i.e., not behind a firewall) and username is the user at that machine (not the Pi). The host will act as middleman machine for accessing the Pi.
A script suitable for a cron job (first create an empty passphrase ssh key and add it to the host's ~/.ssh/authorized_keys file).
$ cat create_ssh_tunnel.sh
#!/bin/bash
createTunnel() {
  /usr/bin/ssh -i /path/to/sshkey -f -N -R 2222:localhost:22 username@host
  if [[ $? -eq 0 ]]; then
    echo Tunnel to ix created successfully
  else
    echo An error occurred creating a tunnel to ix. RC was $?
  fi
}
/bin/pidof ssh
if [[ $? -ne 0 ]]; then
  echo Creating new tunnel connection
  createTunnel
fi
2. Accessing the Pi
On any other machine from which you wish to access the Pi directly, add something similar to the following to your ~/.ssh/config file:
Host interpi
    User norris
    HostName host
Host pi
    User pi
    HostName localhost
    Port 2222
    ProxyCommand ssh interpi nc %h %p
Above "host" is the hostname or IP address of the middleman host used in the reverse tunnel in the first step.
Then, to connect to the Pi directly just do ssh pi.